7 Easy Steps to Writing an Effective School Website on WordPress
 Christina Battons —
WordPress is one of the simplest tools for website creation. It is also one of the most widespread ones, currently powering more than 28% of the web. Therefore, if you do intend to create an effective school website but don’t have much experience in the field, WordPress could be the best option for you. It supports a number of useful plugins and offers a variety of beautiful designs. Furthermore, many of them are free or inexpensive, so it’s possible to create a great well-functioning website without spending much money in the process.
In this blog post I’ll give you tips to set up your own Wordpress website and some ideas on what to use it for.
How to build a WordPress school website - 7 steps
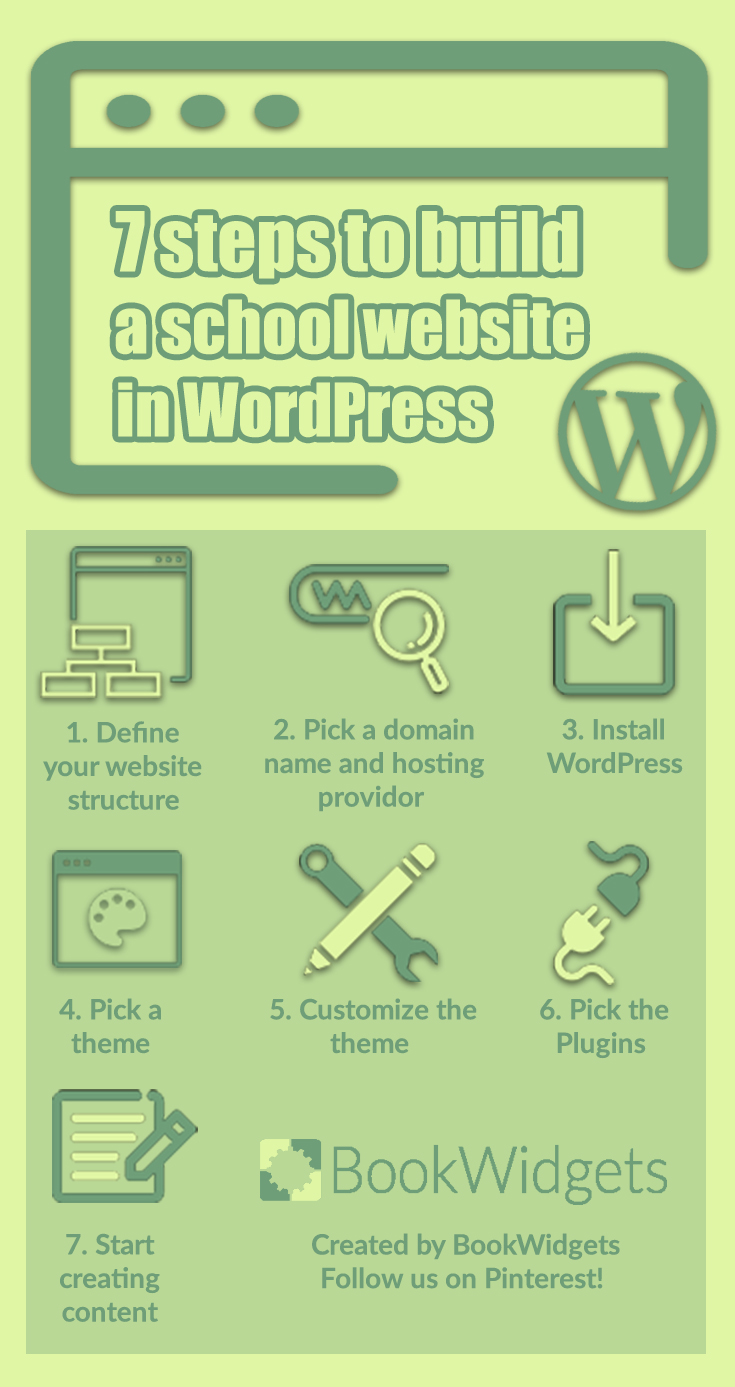
1. Define your website structure
 Although each website is different, there are some elements they have in common. This structure is important to keep in mind for the next steps. Your website structure is a guideline to build your website.
Homepage: the main page of your website where you’ll place your logo, share images, news, and events, and post important notices;
About page: this is where you need to share information about the school’s history, its values, location, certification, and so on;
Education/Courses page: just like the title indicates, here you can give information about the education process, the courses the school offers, etc.;
Faculty information: here, you can write about the teachers and other staff members;
Registration form: this isn’t an obligatory option, but you have to include it if you want the students to sign up for the school’s classes online;
Contact form: here, you can list your contact data or even create a separate form allowing the visitors to send you questions or information.
Take some time to think about which one of them you need to include first. If you are a beginner, it’s often better to start with less. You can add a couple of elements, write all the information, and then add some later.
2. Pick a domain name and a hosting provider
 Picking a domain name for a school generally isn’t very difficult - the name of the school can be it. However, you still need to think about the type of domain you would want. Do you want to pick a <<.com>> one? If yes, then you’ll need to register it later, while picking the hosting provider. If you want a <<.edu>> one and are a registered US school, go to EduCase to register it. Then, you need to pick a hosting provider for your school. The task could seem daunting but with a bit of additional research you’ll definitely make it. You can check the WordPress hosting recommendations for additional guidance as well.
3. Install WordPress
 If you already have hosting, you’ll need to follow the official WordPress guide to install it. If you don’t have hosting yet, you can start by registering a WordPress account and by creating your website on a .wordpress.com domain. Don’t worry, you’ll be able to switch to another domain later.
4. Pick a school website theme
 Picking a theme might seem like the easiest thing to do, but it’s harder than you think. Besides the overload of theme templates, there are some other things you need to consider that have an impact on your WordPress theme for school website:
The price. Do you need a free WordPress theme or a paid one? Don’t worry, you’ll be able to find a good one either way. However, you’ll need to double check the price if you don’t want to invest in a paid one. Keep in mind though, that the paid themes are the only ones that are supported by developers, so if this is important for you, it’s better to choose the paid one right from the start.
Responsiveness. Many of the visitors of your website will view it from various mobile devices. Therefore, it’s important to ensure that the theme isn’t just good-looking, but also responsive (meaning it is optimized for various devices and screen sizes).
The design. Your website needs to look professional. It also needs to be easy to view and read. Pick a theme that meets these criteria. If you aren’t sure about that, ask a couple of people to give their opinion about the readability of a certain theme.
5. Customize the theme
 Now, remember that first tip? It’s time to follow it. If you decided which sections of the website you want to create and which elements do you need to include, you can move on to the customization. Here’s a detailed customization guide to help you. Keep in mind that all the themes are different, and some of them are more flexible to customize than the others. So if a theme doesn’t seem to offer you enough customization opportunities, consider picking another one.
6. Pick the plugins
 Plugins are the software that can be added to WordPress in order to improve and expand the functionality of your website. When it comes to the choice of plugins, there’s no unique advice for all. You need to pick the ones that you consider useful.
Of course, this could be a challenging task if you haven’t heard about the plugins before. Lucky for you, various online guides can always help you to pick the right plugins and to install them on your website.
Plugins are the software that can be added to WordPress in order to improve and expand the functionality of your website. When it comes to the choice of plugins, there’s no unique advice for all. You need to pick the ones that you consider useful.
Of course, this could be a challenging task if you haven’t heard about the plugins before. Lucky for you, various online guides can always help you to pick the right plugins and to install them on your website.
This one from BookWidgets for example, let’s you embed great selfmade interactive exercises. Perfect your you classroom website! Find out what kind of exercises you can create with BookWidgetst to spice up your website right here.
7. Start creating the content
 When your website is finished and polished, it’s time to fill it with content. Some content just needs to be there (for example, all the information about the school, including the contacts). Some, however, isn’t obligatory to write (like students' info page, for example). Here’s the content you might want to create:
- Information about the school and its contacts;
- Information about the classes and courses the school offers;
- Gallery (if you have the pictures or videos to fill it with);
- News and events;
- Information about the faculty members;
- Information about the students;
- Parents' testimonials;
- Students' success stories;
- Blog or newsletter;
- Fun BookWidgets exercises. Here’s how.
Of course, the creation of the content might take some time, so it’s better to do it before you finish creating the website. If it isn’t possible, consider creating only a couple of website’s sections first and then adding some more. It would look minimalist but still better than a website where only half of the pages are filled with content.
Now that you know all that you need to create a school website on WordPress. All you need to do is start. Good luck!
Easy alternative for WordPress classroom blog
If you just want to set up your own classroom blog, without creating a whole new Wordpress site for it, there’s a creative alternative: use a BookWidgets Webquest. With the BookWidgets WebQuest editor, you can add pages, sections, text, images, links, fun games, videos and so on. You can easily adapt the content and update the WebQuest. Just share the link with your students (and parents) and they get to follow what happens in you classroom. There are even more things you can do with a WebQuest.
About the author
Christina Battons is a web content expert from LA. Creative writer, she is able to connect various thoughts into a single theme. Christina loves to stay up to date on the latest content marketing trends, and her works have been published on here. Connect with Christina on Twitter.