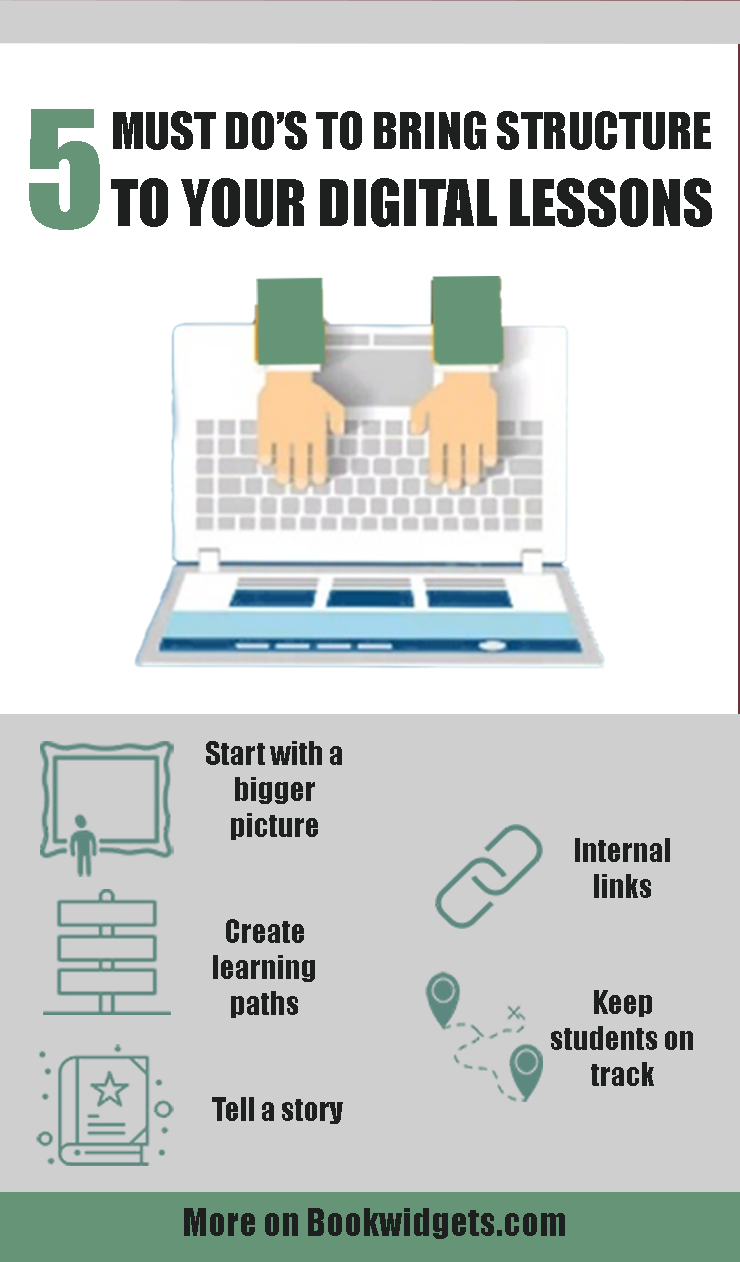
5 Clever Ways to Bring Structure to Your Digital Lessons
 Lucie Renard —
Today, many teachers are still using laptops and digital tools in their classrooms, making digital lessons and online assignments an important part of everyday teaching. It can be challenging to create engaging digital content quickly and keep students focused when they’re working on screens for long periods.
In this post, I’m sharing 5 practical tips to add structure to your digital lessons. These strategies help students stay on track and focused, whether they are working individually, in groups, or following a blended learning model.
Students can easily lose sight of what they need to do or learn when lessons, tools, and assignments are spread across multiple platforms. The good news is: there’s a solution to help teachers bring clarity, structure, and focus to their digital classrooms.
ONE digital classroom for distance learning
This digital classroom is a school-level classroom, not just something any teacher may choose to do or not to do. If you're not on the same page as your fellow teachers, your students won't be on a page at all.
There are many tools you can use to set up this digital classroom. It really doesn't matter which tools you use, as long as they can cover these 5 key components. You'll need to:
- Have a learning environment accessible for teachers and students. Tools: Google Classroom, Microsoft Teams for Education, Canvas, Schoology, Moodle, ...
- Interact with students remotely. Tools: Google Meet, Microsoft Teams, Zoom, ...
- Provide digital, interactive learning materials. Tools: BookWidgets, Kahoot, Tes Blendspace
- Instruct students digitally. Tools: Screenastify, Screencast-O-Matic, Loom, WeVideo
- Stimulate collaboration. Tools: Padlet, Google Docs, Miro
Choose any combination of digital classroom tools that fits your teaching style, but avoid using too many at once. When selecting tools, consider whether they can integrate with each other, as using a single platform that connects multiple tools makes managing digital lessons and online activities much easier. For more ideas on setting up an effective remote classroom with a combination of these online learning tools, check out this blog post.
Tip 💡 BookWidgets integrates with all the learning management platforms mentioned above. As it's a very comprehensive tool, you'll notice that I mention it a few times below as well. This makes it easy for you to just keep a hand full of good tools, all in one.
How to bring structure to your online lessons
1. Start with a bigger picture
 Giving your students an overview of what they will learn is one of the simplest ways to provide structured learning. Students can always refer back to the overview to see what they’ve covered and what still needs attention. When working on entire lesson themes or units, having this clear structure helps them stay on track and follow a steady path.
Digital Checklists
A digital checklist is a simple but powerful way to give structure to your lessons. Students just have to follow your steps and check off the tasks if they finished them.
Before starting a lesson, you could include a digital checklist with the learning goals. Students can tick off each item once they’ve completed it and feel confident they understand the material. The checklist will bring structure to learning, but above all, it will help your students recognize on their own if they understand the topic (metacognition).
Digital checklists can also be agendas with lesson topics or units. Students immediately know what to expect, and can check off the topic/unit.
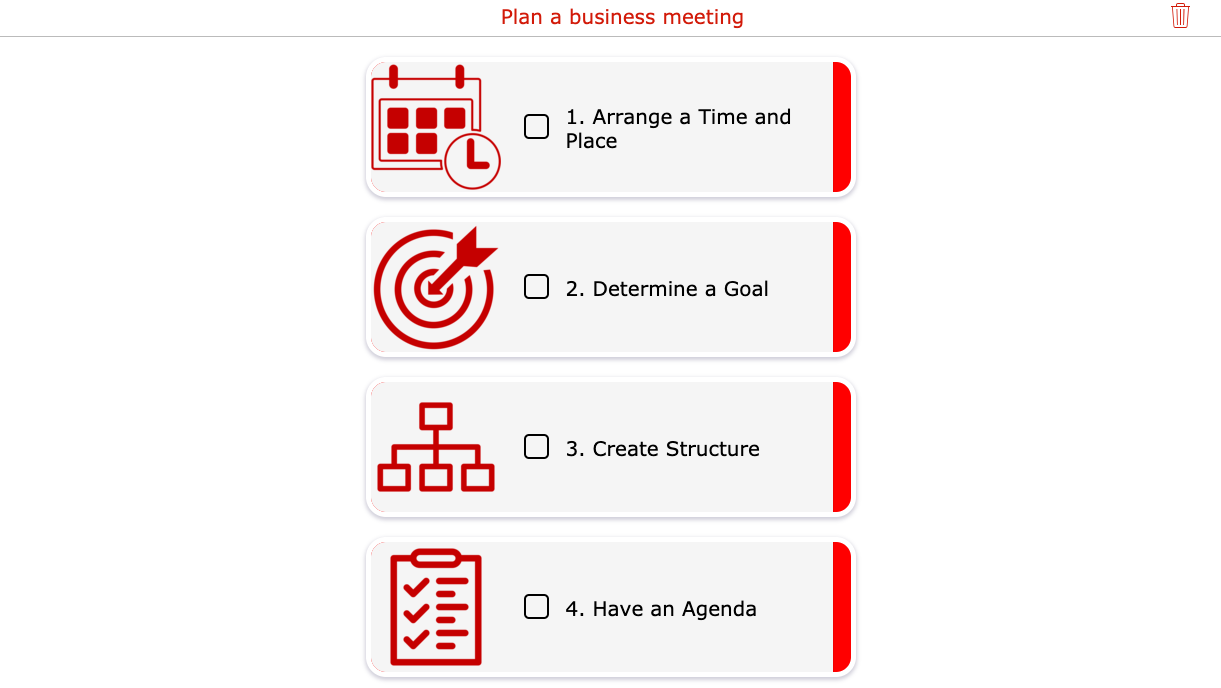
Another way to use a checklist is by giving students steps they have to follow to get to the end of the assignment. Here's an example of a digital checklist about building a strong password:
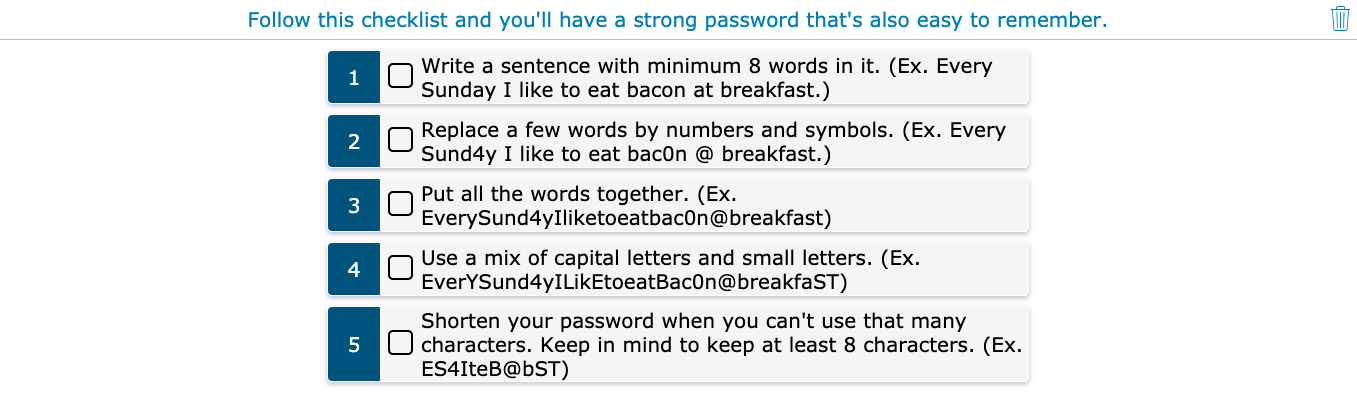
This simple but structured checklist is made with BookWidgets. Just choose the checklist widget.
Mind maps
Another way to bring structure to your lessons is by using mind maps. Start by creating a mind map that shows the bigger picture of your topic. What are your students going to learn? Just put the main topic or theme in the middle, connected with the smaller topics that link directly to your main theme.
At the end of the lesson, ask students to create their own mind map. Have them include all the key points they just learned, adding details as needed. This reinforces the lesson structure a second time and gives students a visual way to organize and connect their knowledge.
✨ Bonus: while building their own mind map, students actively retrieve information, which helps with knowledge retention and strengthens memory.
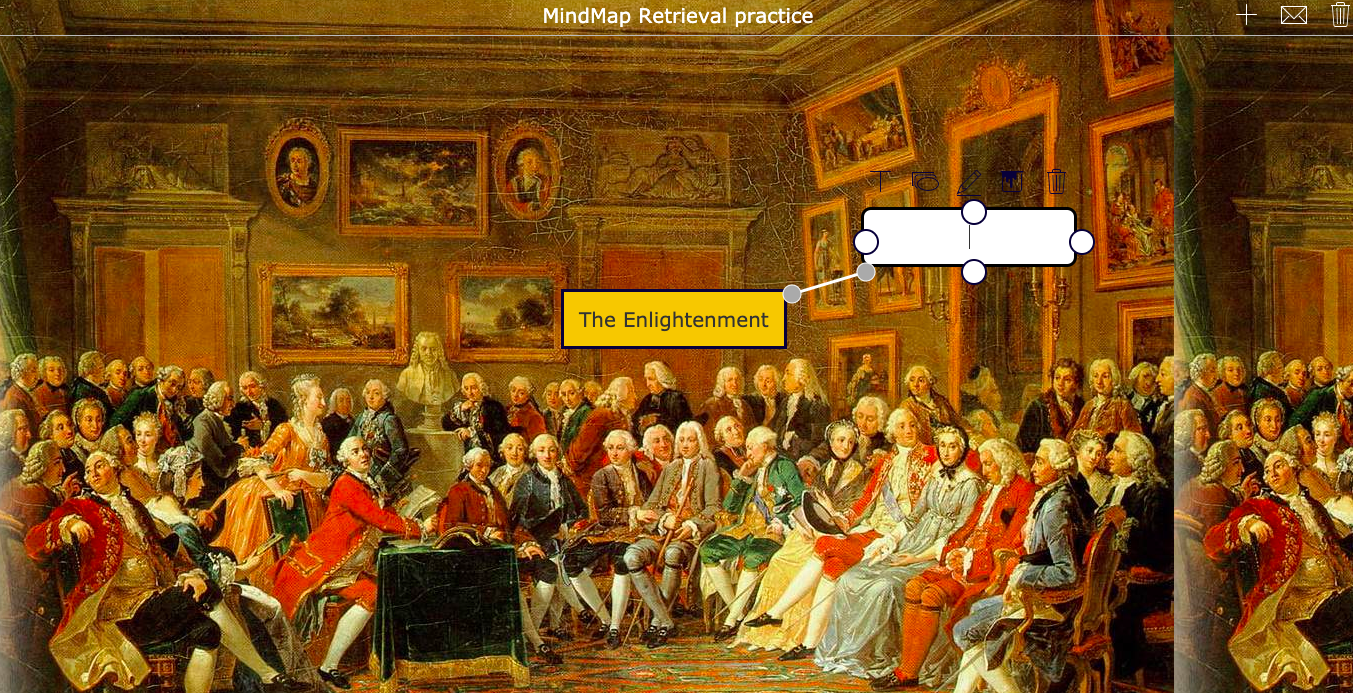
So what do you remember from "The Enlightenment"? 😉 Add balloons to the mindmap and structure them if you still know a few things.
2. Create learning paths students can follow
 Designing a step-by-step learning path is one of the most effective ways to structure digital lessons, especially when students need to work independently. Clear learning paths help students know exactly what to do next, keep them focused, and support engagement in online or blended learning.
There are a few ways to create a learning path for students.
BookWidgets Planner
With BookWidgets, you can create lots of different interactive exercises. Choose the "Planner" widget or exercise template to create a learning path.
Add different tasks, such as:
- BookWidgets exercises
- YouTube videos
- links to online exercises and resources
- audio instructions
- an extra list with more tasks for students to add to their learning path
You can give the tasks different colors or add images in front of the links.
Can't imagine what this looks like? Below is a simple example without interactive elements. Know that you can add more BookWidgets exercises (such as auto-graded worksheets), other links, videos, and more behind the icons in the example! Students can easily tick off the steps they have done an follow their path.
Tip 💡 Follow this short webinar tutorial on how to create interactive learning paths in the BookWidgets Planner.
BookWidgets Structured Multimedia Quiz
If you choose the "Quiz" widget, you can group related questions together and guide students through them step by step. With the Question Page feature, you can add videos, text, images, or other supporting resources that automatically appear in a split-screen view right when students need them, taking your digital lessons to the next level.
This creates a calmer and more focused learning experience for students. No more clicking around, searching for information, or switching between tabs. Everything they need is right there.
Curious to see what this looks like for your students? Check out the example below. You can even copy it straight into your own BookWidgets account. Adapt it, reuse it, or simply explore how it’s built, whatever helps you most in your own lessons.

Tip 💡 If this doesn't make much sense to you, just watch our step-by-step video tutorial on creating structured multimedia quizzes! Or read our blog post to discover the benefits and two more examples.
Symbaloo
With Symbaloo, you can create a path with different tiles. Behind the tiles, you can add learning materials, links, and, again, BookWidgets exercises to make your lessons more interactive.
Here's an example:
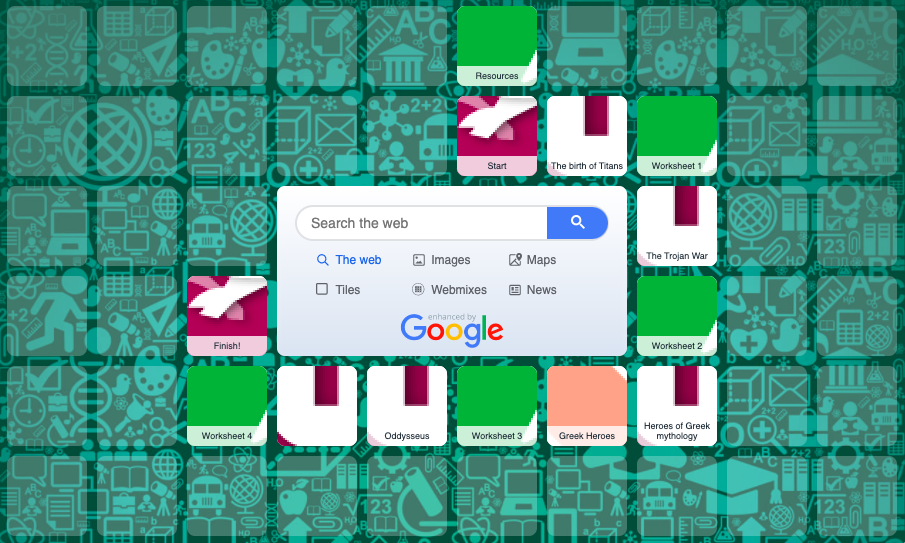
This example is created with the standard version of Symbaloo. For education, there's now a better way to create your learning paths, without advertising.
3. Tell a story
 Another way to bring structure to your lessons is by telling a story. A
story always has the same stages that are familiar to students, so they know
what to expect, and more importantly, how to remember it.
Another way to bring structure to your lessons is by telling a story. A
story always has the same stages that are familiar to students, so they know
what to expect, and more importantly, how to remember it.
Create a WebQuest for students, where students go through different stages in your lesson. You clearly define the steps and themes in your WebQuest.
Take a look at this WebQuest (made with the BookWidgets WebQuest widget) about Ancient Rome, teaching students about the time and life back then.

The fun thing in this example is the inclusion of interactive elements. Students are involved in your lesson, as they have to solve a problem in the story, and help "Spartacus" escape. Along the way, students learn more and more about the lesson content. You could compare it with a digital escape room.
Check out this post on creating digital escape rooms using this WebQuest template and your own lesson content.
4. Keep students on track
 When teaching from a distance, it's hard to get an overview of what your students are learning/doing at that exact moment. Aren't they drifting away?
I've got two tools that help you keep your students on track.
PearDeck
With PearDeck, you can create an interactive slideshow. Students sign into your PearDeck lesson using the unique code, and the teacher sets the pace of the presentation: when you go to the next slide, all your students will be guided to the next slide as well, making sure they are on the right slide. You can even add interactive elements such as quiz questions and whiteboards. Every student can answer these in real time on their own device. This truly engages students, and you're sure that your students are participating as well.
Live Widgets
Another way to keep an eye on your students is by using Live Widgets from BookWidgets. If you're using BookWidgets inside Google Classroom, MS Teams for Education, or another LMS, you can follow student progress live while they are working in a BookWidgets activity. You can see students answer the questions, and you can immediately see if those are correct or not.
Live widgets give you a quick glimpse of what your students are doing (and not doing). It detects inactivity as well, so you know when a student is stuck and needs help. Read all about the possibilities in this post.
Tip 💡 Take a look at this tutorial on the live widgets. In this tutorial, you will learn step by step how to follow your students’ live activities while they are working. Or check out this blog post on how to monitor students' progress using live widgets.
5. Internal links
 Digital lessons come with many handy features. One simple way to bring structure to your digital lessons is by using internal links. When students click “next,” they go exactly where you want them to, without confusion or getting lost. This helps you organize digital lessons for teachers and create a digital tour through your lesson, where each link connects to the next and forms a smooth, closed loop.
Even if you are not in the room, students can still follow the lesson independently. Using internal links this way encourages self-paced learning in digital classrooms, supports differentiation for students, and makes technology integration in education more effective.
WebQuests
Use a BookWidgets WebQuestwidget to create a complete digital lesson. Combine videos, images, text, other exercises, and weblinks. Students go through different stages in your lesson. You clearly define the steps in your lesson, and you can build internal links to parts of your lessons to make sure students don't just skip a part.
Check out this webinar about the possibilities of the WebQuest widget.
Powerpoint/ Google Slides
You probably know this one already: Powerpoint or Google Slides and even other presentation tools allow you to link to other slides further ahead. When you give students slides to go through individually, the links give them the right path to follow.
Wrap up
Bringing structure to your digital lessons doesn’t have to be complicated. By giving students a clear overview, guiding them through learning paths, and using tools to monitor progress, you create an environment where they can stay focused.
BookWidgets helps combine structure and interactivity, making it easier to design lessons that work in and outside the classroom. I hope this post has given you new tips and inspiration to get started with structured digital lessons.
If you’d like to exchange ideas, get inspired, or ask questions, feel free to join our Teacher Community on Facebook. You can also stay up to date by following BookWidgets on Bluesky, LinkedIn, and Instagram.
And me? I'm Lucie from BookWidgets. Follow me on LinkedIn 👋