How to share your iPad screen with a computer or projector in your classroom
 Lucie Renard —
The right (and working) technology in your classroom is the dream of every teacher. But not all teachers are so lucky to have a 1 to 1 classroom. A lot of teachers have to figure out ways to teach with one computer or tablet.
In that case, you should be able to connect your iPad to the computer or to a projector. There are some ways to do this and I’ll explain the most obvious ones.
Connecting your iPad to a projector
Apple lightning to VGA adapter
To get your iPad working on a projector, without another computer involved, you can buy an Apple Lightning to VGA Adapter. Before you buy this, you should consider some disadvantages. First of all, the price. It’s very expensive. Also notice that it’s a very short cable. This way, you can’t take your iPad with you and you have to stay behind your desk.
Apple TV
You can connect Apple TV to your projector or to a tv. Once you have done that, you can wirelessly connect to Apple TV through your iPad. Use the Airplay functionality on your iPad to do that. Swipe up from the bottom centre of your iPad and you’ll see the option “AirPlay Mirroring”. If you click on it, you can choose for Apple TV. Yes, it’s wireless, but it’s also expensive.
Connecting your iPad to a computer wirelessly
Reflector 2
 Although this app isn’t directly connected to a projector, it is a good and cheaper alternative to the Apple cable or Apple TV. Reflector 2 is an application that is installed on your computer (not your iPad!) for Windows or Mac.
Install the application, swipe up from the bottom centre of your iPad and choose for “AirPlay Mirroring” once again. Then choose your computer. This would be too easy is there weren’t some downsides to this application. So, here it is: sometimes it just doesn’t work. This is because your iPad and computer must be on the same strong Wifi network. And that might be an issue for some schools. But when it works, it’s just so handy. It even shows your iPad’s screen in an iPad and you can record it!
Airserver
 This application works in exactly the same way as Reflector 2, but it has a little extra for the Android fans. Where Reflector 2 is only available for iOS and Windows, Airserver also works on Android. Besides that and a price difference of $1, it also works for Xbox One and multiple iPads and phones can be projected on just one computer. This way your students can show their work to the whole classroom too.
Connecting your iPad to a computer with a cable
When both options above don’t work because of a bad internet connection, you can always do it the old fashioned way. Simply use the USB cable that came with the iPad and connect your iPad to your computer. Heads up, this will only work on a mac computer, unless you have downloaded the “QuickTime Player” app for Windows.
 Open “QuickTime Player” - standard on your mac - and click on “done” to close the pop up. Then go to the QuickTime Player’s menu in the upper left corner and click on “file”. Then start a “New Movie Recording”. It will open up your webcam. To change that, just click on the arrow next to the red recording button on the screen and choose your iPad. Now you can see your iPad on the computer’s screen. Plug in the projector and you’re on your way!
Projecting paper documents with your iPad
In just a few years time we went from an old overhead projector to a modern beamer. This opened up a whole new world of opportunities. However, there are still some limitations to a beamer. How do you project paper worksheets, or your students' work without scanning every sheet?
I just showed you how to mirror an iPad’s screen to your computer. Keep that in mind for later. You’ll need that.
The solution is easy. Buy, create or reinvent your own iPad document camera stand. Place your iPad and put the book or papers you want to project beneath it.
You can mirror the iPad with the camera open. That way, your students will see, what the camera sees. This is the easiest option, but not the most fancy one. Other apps allow you to draw and annotate over a live picture.
IPEVO Whiteboard
 IPEVO Whiteboard allows you to draw and annotate directly onto a real-time camera image from your iPad, images in the Photo Library, or from a blank whiteboard. Install the app on your iPad and get a range of basic tools like a pointer, free draw, straight lines, squares and ovals, and text boxes. you can also record video and audio on static or live image backgrounds.
The app is very intuitive and lets you switch easily between multiple boards. You can even save your board as a snapshot to your Photo Library.
Stage
 Stage kind of does the same as IPEVO Whiteboard. Create, collaborate, and demonstrate. Support your camera with the power of an interactive whiteboard to get some handy features: Freehand sketch over live video or images, insert pictures, shapes, text and labels, record videos or screen capture images you can save directly to your device photo library.
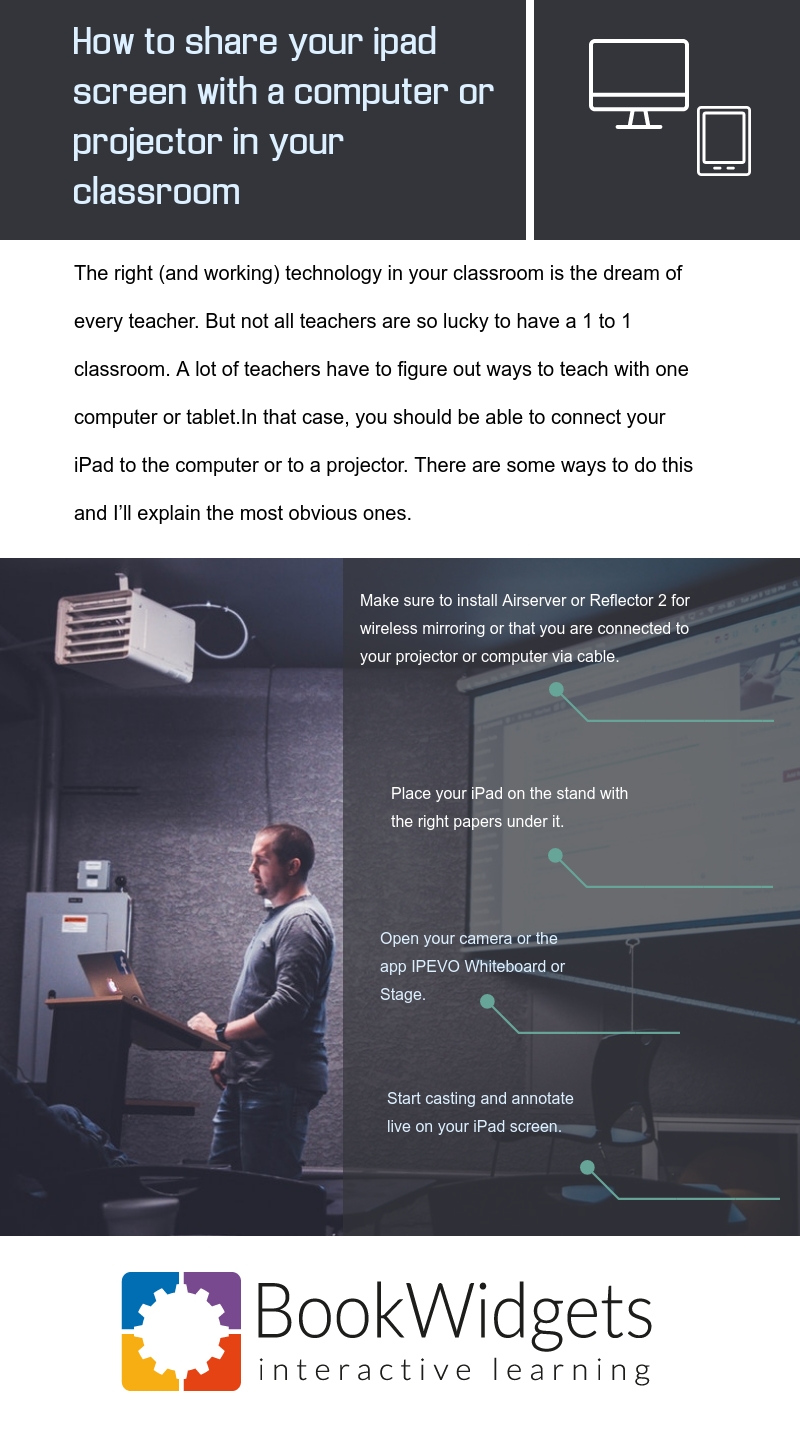
In short
Here’s how you get it done:
- Make sure to install Airserver or Reflector 2 for wireless mirroring or that you are connected to your projector or computer via cable.
- Place your iPad on the stand with the right papers under it.
- Open your camera or the app IPEVO Whiteboard or Stage.
- Start casting and annotate live on your iPad screen.
So, that’s all! Don’t feel limited by these apps, just because I mention them in my post. There are other apps out there too!